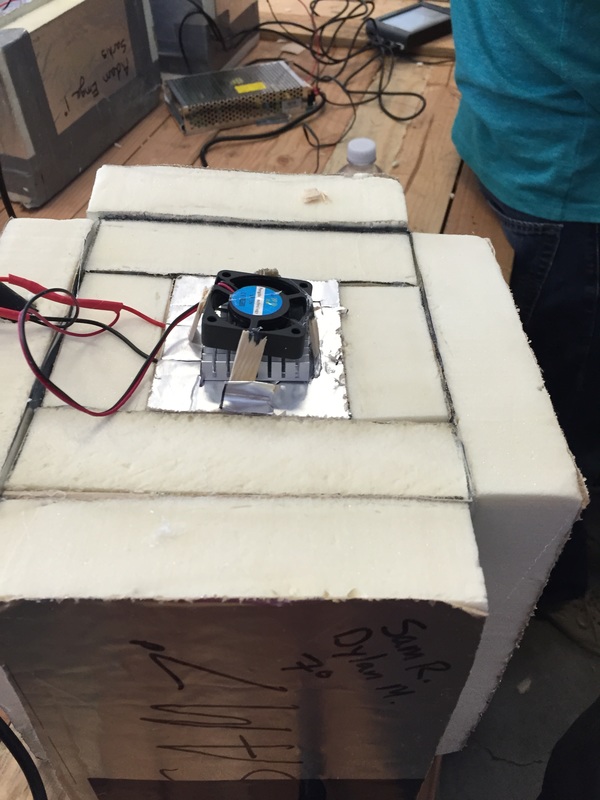
Version 1
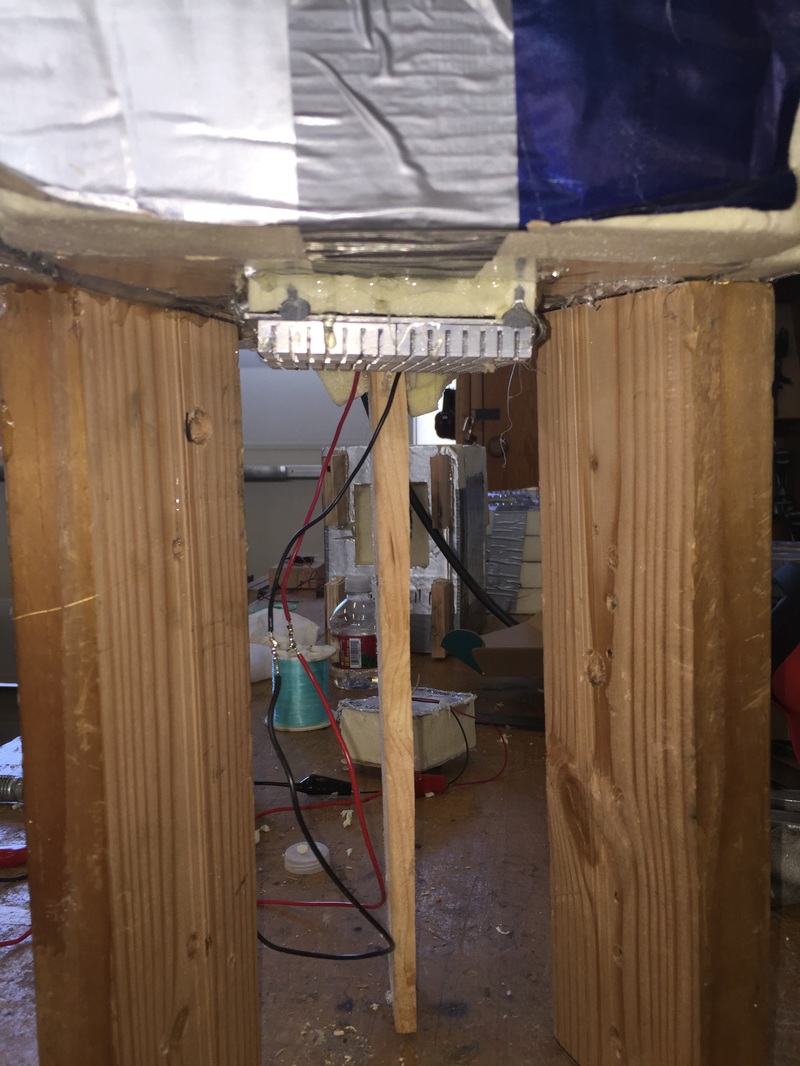
Version 2 (the bottom is the only part that really changed, there is just no peltier or fan on the top)

|
Project.
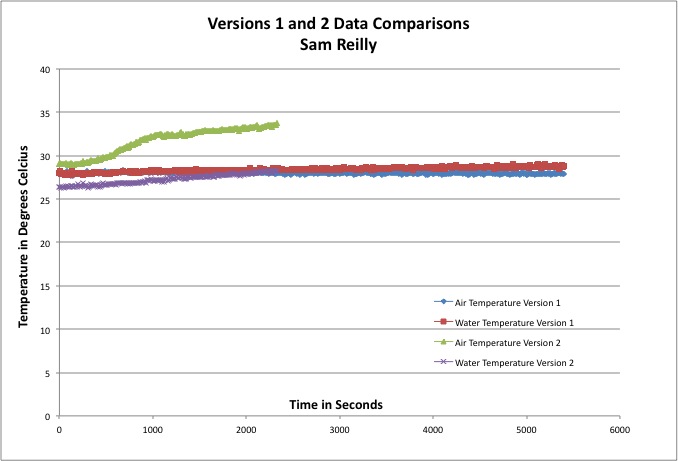
In this project, we were tasked to make a refrigerator that would cool a small bottle of water. Project Questions. The learning goal of this project was to understand the overarching questions, which are: What is heat? How does heat transfer? What stops heat form transferring? Project Goals. To create a refrigerator that effectively cools the water bottle. This would be accomplished by understanding the answers to the project questions. Project Outcome. The graph on the left illustrates the temperatures of the water and air in our refrigerators (Versions 1.o and 2.0). As you can see from the blue and red lines, v1.0 did not heat or cool the water bottle, and raised the temperature of the air inside by 1º, to 29º Celsius. The green and purple lines represent v2.0. The air temperature in v2.0 rose substantially (from 29º to 34º C) and the water temperature also rose 2º (from 26º to 28º C). Both refrigerators' air temperatures rose as the system inside tried to reach thermal equilibrium. However, it should be noted, the day we tested v2.0, the air temperature inside the fridge was hotter before the test started, than the day we tested v1.o. Version 2 could only be tested for 2330 seconds due to time constraints. Version 1.0 had the peltier on top of the fridge, with the heat sink facing upwards, and a small fan blowing air through it. The temperature increased in v1.0 because the fan could not dissipate enough heat energy from the peltier and heat sink.The temperature of the water was not raised as much because air is able to conduct heat more quickly and the plastic around the water acted as a small amount of insulation. The plastic bottle had a higher R value than the air. Version 2.o did not work -- we failed in cooling the water or air. However, we learned a lot in the process. We used the same design as v1.0 but moved the peltier to the bottom, put the refrigerator on wood stilts, and had the water bottle sit directly on the cold side, (with the mega heat sink coming out of the bottom of the fridge.) We used a jumbo fan to cool the mega heat sink. The fan's "blind spot" (where no air was blown) lined up perfectly with the heat sink. The heat that was created just sat on the heat sink and in the air under the fridge. This caused the temperatures inside to spike and the peltier device to possibly fail. V1.0 outperformed v2.0 only because v1.o didn't heat the water or air nearly as much. V1.0 failed to cool the water more significantly because the convection inside the refrigerator was not enough to spread around the cold air to cool the water bottle. Version 2.0 could not be adequately cooled and therefore caused the peltier to overheat. The heat energy created by the peltier device was so immense the convection and conduction utilized by the mega heat sink was not enough to cool the peltier without the fan blowing directly on it. Conclusion. In conclusion, we did not meet the project goals, but did meet the learning goals. While we couldn't cool the water bottles, I learned all about the basics of thermodynamics. I can now describe what a system is and the methods that it will use to reach thermal equilibrium and how, theoretically, the ideal refrigerator would work. V 1.0 The first thing that my partner and I did to tackle the problem was to draw a few simple ideas of what we thought the refrigerators would look like. We settled on pyramid type shape with a flat top and bottom. The reasoning for this was if hot air rises we want all of it to be in the smallest place possible so it could be cooled by the peltier device. The pelteir device is an electrical device (insert picture of peltier diagram) that causes one side of a tile to be cold and the other to be hot. We used rigid foam insulation (RFI) as the body of the refrigerator original design. We designed the refrigerator to be constructed of 2 trapezoids that were 1.75" x 3" on the bases and 2 trapezoids that were 3.25" x 4.5" on the base. The sides would then be rectangles to fill the gap, and it would sit on a base of the same foam material. We began by cutting out the trapezoids with a box cutter, but the cutter wasn't thick enough to cut all the way through. We then tried to use a coping saw to cut out the trapezoids. The coping saw worked but the cut was very rough and the sides had lots of holes. We decided to scrap the bad pieces we cut out and cut all 4 pieces out on the band saw. Click here for a comparison of coping saw cut edges and band saw cut edges. We attached the new pieces together with a thick layer of hot glue. We then glued all the pieces together and used the left over pieces to add on another layer of insulation. I then wired the fan and peltier device together. This allowed both of them to be powered by one cable. Then we cut out a square on the top of the fridge that fit the peltier device. We put thermal cream between the peltier device and the heatsink, and placed the fan on top of the heat sink on popsicle stick stilts. Finally, we placed the water bottle inside of the fridge, inserted the temperature probes, and closed it all up. We then tested the refrigerator and came up with these results. As you can see, we didn't make a very good refrigerator. This was because our small fan and heat sink could not evacuate all the heat energy that was created by the peltier device. In our next refrigerator, we will improve the design by creating a better way to evacuate the heat energy created by the peltier device, and by using much larger heat sink(s) and fan. V 2.0 For version 2.o we used mostly the same design. On the top panel we added a fan to the top panel and moved the heat sink and peltier device from the top of the device to the bottom. We used a mega heat sink on the bottom of the fridge with the peltier facing cold side up into the inside of the fridge. The water bottle would then sit directly on the cold side of the peltier with a fan blowing on it from the top. We propped the whole fridge up on stilts and used a mega fan on the outside to blow on the mega heat sink. The mega heat sink protruded from the bottom of the fridge with the fan facing it. It did not turn out well. We placed the heat sink in the direct spot that the fan would not blow air. This caused the system to overheat. (Refrigerator v2.0 actually became "Oven version 1.0".) Although we didn't meet the project goals, we did meet the learning goals. After completing this project, I now know that: -Heat is a measure of the level of activity of microscopic constituents of matter. -Heat is transferred through convection and conduction. Conduction being a method that heat is transferred by two substances touching each other, and convection being the property of hot matter to rise and cool matter too fall, forming a cycle. -Heat is stopped from transferring if it cannot excite the molecules near it. Molecules that are spaced far apart, or are not easily excited will not transfer heat as well, and therefore the substance will have a higher R value. I also learned that sometimes, you don't succeed, but regardless you can always learn something in the process. Another important lesson I learned was that being careful and thoughtful while working will lead to better results with your finished piece. If I had to redo this project, I would try different methods of dissipating the amount of heat created by the peltier. I would also make sure the fan was really blowing on the heat sink. |
